



Manual testing remains the backbone of quality assurance in most software teams. Even organizations with mature automation still rely on human testers for exploratory work, usability checks, and edge-case validation. Yet many teams run their manual test cycles without a repeatable, structured workflow — and the result is missed defects, inconsistent documentation, and wasted effort. This article walks you through a practical, end-to-end manual testing workflow you can adopt in your next sprint. You will find specific steps for test case writing, test execution, defect logging, retesting verification, and test summary reporting. Whether you are a junior tester building habits or a test lead standardizing your team's process, the goal is the same: make every test cycle predictable, traceable, and efficient.
What Is Manual Testing?
Manual testing is software testing performed by a human tester who executes test cases, observes system behavior, and compares actual results against expected outcomes — without the aid of test automation scripts. ISO/IEC/IEEE 29119-1:2022 defines testing as the process of evaluating a component or system to determine whether it satisfies specified requirements [1]. In manual testing, that evaluation relies on human judgment, domain knowledge, and analytical skill rather than programmatic verification.
Why Manual Testing Still Matters
You might wonder whether manual testing is becoming obsolete. It is not — and here is why. Automation excels at repetitive regression checks, but it struggles with subjective assessments like usability, visual consistency, and workflow intuitiveness. The ISTQB Foundation Level syllabus explicitly identifies human-driven techniques such as exploratory testing and experience-based testing as complementary to scripted approaches [2].
Manual testing is especially valuable when you need to evaluate a new feature for the first time, when requirements are still evolving, or when the cost of automating a test exceeds the benefit. Treating manual and automated testing as partners — not competitors — tends to give teams the broadest defect coverage across both functional and non-functional quality characteristics [3].
The Manual Test Cycle: Phase by Phase
A well-structured manual test cycle typically follows five phases. Each phase produces a specific artifact and feeds into the next. ISO/IEC/IEEE 29119-2:2021 defines a test process model that maps closely to this practical workflow [4].
- Planning — Define scope, objectives, entry/exit criteria, and schedule.
- Test Case Writing — Design and document the test cases you will execute.
- Test Execution and Logging — Run each test case and record results in test execution logs.
- Defect Logging and Retesting — Report failures, verify fixes through retesting verification.
- Test Summary Reporting — Aggregate results and communicate the quality status to stakeholders.
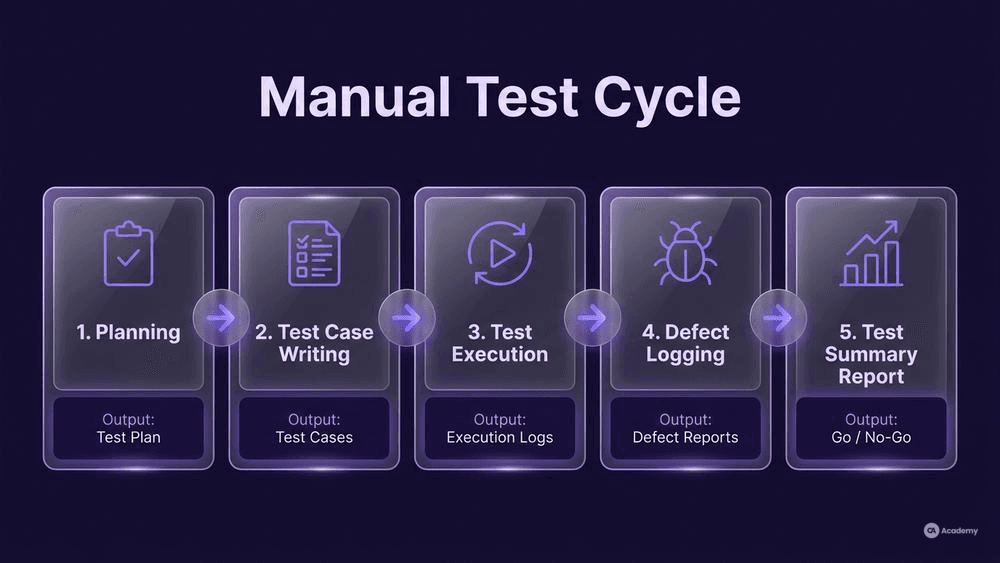
Skipping or compressing any of these phases tends to introduce risk. Planning without documentation leads to scope creep. Execution without logging leads to untraceable results. Defect reports without retesting lead to false closures.
Test Case Writing
Good test case writing is the foundation of a reliable manual test cycle. A test case is a documented set of preconditions, inputs, actions, and expected results designed to verify a specific requirement or behavior. ISO/IEC/IEEE 29119-3:2021 provides a standardized template for test case specification [5].
What Makes a Test Case Effective
Keep each test case focused on a single objective. A test case that tries to verify login, navigation, and data export in one flow becomes difficult to maintain, hard to debug when it fails, and nearly impossible to reuse. Test cases with many steps — for instance, thirty or more — can become particularly challenging to maintain in agile environments where requirements change frequently.
Practical template for a manual test case:
Field | Example |
|---|---|
Test Case ID | TC-LOGIN-001 |
Title | Verify successful login with valid credentials |
Preconditions | User account exists; browser is open to login page |
Test Data | Username: testuser@example.com / Password: Valid123! |
Steps | 1. Enter username 2. Enter password 3. Click "Login" |
Expected Result | User is redirected to the dashboard; welcome message displays |
Priority | High |
Linked Requirement | REQ-AUTH-01 |
Common Pitfalls in Test Case Writing
- Vague expected results. "System works correctly" is not verifiable. Specify the observable outcome.
- Missing preconditions. If a test assumes data exists in the database, document it. Otherwise the next tester who runs it will fail before step one.
- No traceability. Every test case should link to a requirement or user story. Without traceability, you cannot answer the question "what did we actually verify?"
The ISTQB glossary defines traceability as the ability to identify related items in documentation and software, such as requirements with associated tests [6]. Building this linkage from the start saves significant effort during audits and test summary reporting.
Test Execution and Logging
Test execution is the phase where you run each test case against the system under test and record results in test execution logs. This is where your preparation pays off — or where gaps in your test cases become painfully visible.
Running the Tests
Execute test cases in a logical sequence: start with smoke tests (critical-path scenarios), then move to functional tests grouped by feature area, then edge cases. This order ensures that if a build is fundamentally broken, you find out within the first few minutes rather than after hours of detailed testing.
For each test case, record:
- Status: Pass, Fail, Blocked, or Not Executed
- Actual Result: What you observed (especially on failure)
- Environment: OS, browser, build version, test data used
- Timestamp: When the test was executed
- Tester: Who executed it
What Not to Do During Test Execution
- Do not skip blocked tests silently. A blocked test often signals an environment issue or a dependency problem that needs immediate attention. Log it, escalate it, and track it.
- Do not mark a test as passed if it "mostly" worked. If the expected result is a redirect to the dashboard and you landed on the dashboard with a broken layout, that is not a pass — it is a new defect.
- Do not rely on memory. Document actual results immediately. Retrospective logging hours after execution introduces inaccuracy and omissions.
ISO/IEC/IEEE 29119-3:2021 specifies test execution log structure to ensure consistent, auditable records [5].
Defect Logging Workflow
When test execution reveals a failure, the next step is a structured defect logging workflow. A well-written defect report is the difference between a fast fix and a multi-day back-and-forth with developers.
Essential Fields in a Defect Report
Field | Purpose |
|---|---|
Defect ID | Unique identifier for tracking |
Summary | One-line description of the problem |
Severity | Critical / Major / Minor / Cosmetic |
Priority | Immediate / High / Medium / Low |
Steps to Reproduce | Exact sequence to trigger the defect |
Expected vs. Actual Result | What should happen vs. what does happen |
Environment | OS, browser, build, test data |
Attachments | Screenshots, logs, video recordings |
Linked Test Case | Which test case exposed this defect |
Writing Reproducible Defect Reports
Defects lacking clear reproduction steps are frequently deprioritized or closed because developers cannot investigate them. Invest the extra two minutes to write precise steps. Include the exact test data you used, the exact button you clicked, and the exact error message you received.
Example of a weak defect report:
"Login doesn't work sometimes."
Example of a strong defect report:
"On Chrome 120 / Windows 11, entering valid credentials (testuser@example.com / Valid123!) and clicking 'Login' returns a 500 Internal Server Error. Occurs consistently when the user account has MFA enabled. See attached screenshot and network trace."
Defect Lifecycle
A typical defect lifecycle follows this path: New → Assigned → In Progress → Fixed → Ready for Retest → Verified (Closed) or Reopened. Your team should agree on this lifecycle before the first sprint and enforce it consistently. Deviations — like closing defects without retesting — tend to erode trust in the defect tracking system over time.
Retesting Verification
Retesting verification (also called confirmation testing in ISTQB terminology [2]) is the process of re-executing the specific test cases that previously failed, to confirm that the reported defect has been fixed.
How to Retest Effectively
- Use the original test case. Do not improvise. Run the exact same steps, with the same test data, in the same environment configuration.
- Verify the fix, not just the absence of the error. If the defect was a 500 error on login, confirm that login now succeeds — check that the user lands on the correct page, that the session is established, and that post-login functionality works.
- Check for side effects. A fix to one module can sometimes break adjacent functionality. While full regression testing is a separate activity, a quick sanity check of related features during retesting can catch obvious regressions early.
- Update the defect status. If the fix is confirmed, move the defect to Verified/Closed. If the fix is incomplete or introduces a new issue, reopen it with updated notes.
What Not to Do During Retesting
- Do not retest on a different environment than the one where the defect was originally found, unless the fix specifically addresses an environment-specific issue.
- Do not close a defect based on a developer's verbal confirmation that it is fixed. Trust the process: verify it yourself.
Test Summary Reporting
Test summary reporting is the final phase of the manual test cycle. Its purpose is to aggregate test results into a clear, actionable summary for stakeholders — typically the product owner, scrum master, and development lead.
What a Test Summary Report Should Contain
ISO/IEC/IEEE 29119-3:2021 defines the test completion report as a document that summarizes testing activities, results, and an evaluation of corresponding test items against exit criteria [5].
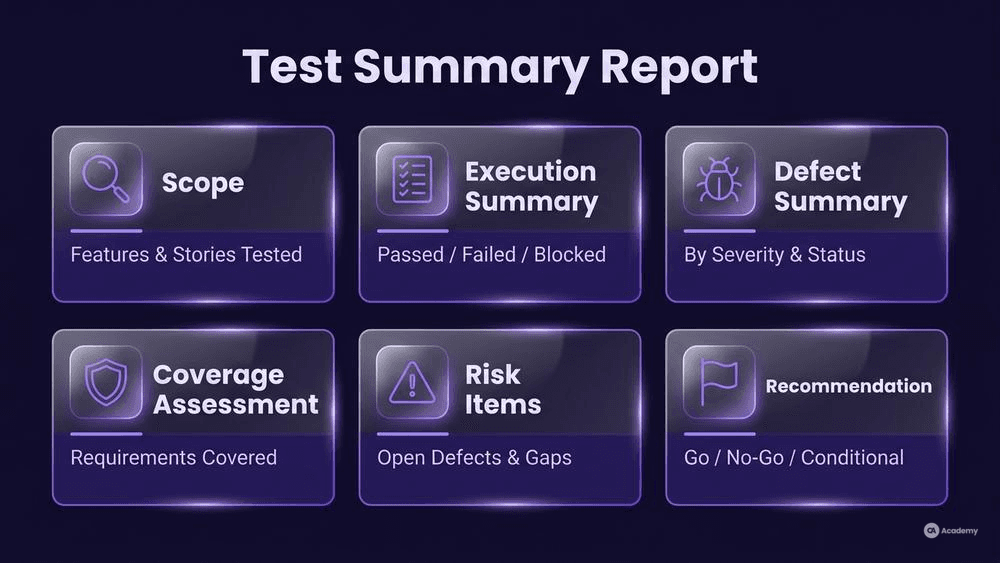
A practical test summary report includes:
- Scope: What was tested (features, modules, user stories)
- Test execution summary: Total test cases, passed, failed, blocked, not executed
- Defect summary: Total defects found, by severity and status
- Coverage assessment: Requirements covered vs. total requirements
- Risk items: Open defects, untested areas, known limitations
- Recommendation: Go / No-Go / Conditional release recommendation
Keep It Actionable
Your audience is busy. Lead with the recommendation, then support it with data. A test summary report that buries the conclusion on page five is not useful. One page — or a single dashboard view — is typically sufficient for sprint-level reporting.
Best Practices (and What to Avoid)
Do This
- Standardize your test case template across the team. Consistency makes reviews faster and onboarding easier.
- Review test cases before execution. Peer review catches ambiguity, missing preconditions, and redundant tests.
- Maintain a traceability matrix. Link every test case to a requirement and every defect to a test case. This supports both audit readiness and impact analysis. The TMMi model identifies managed test processes and defined traceability as key maturity indicators [7].
- Time-box exploratory sessions. Exploratory testing is valuable, but without a charter and time limit, it tends to lose focus.
- Rotate testers across features. Fresh eyes catch defects that familiarity overlooks.
Avoid This
- Do not treat test documentation as optional. Undocumented testing is untraceable testing. If you cannot prove what you tested, you effectively did not test it.
- Do not skip retesting. Closing defects without retesting verification is a common source of escaped defects. Build retesting into your sprint cadence.
- Do not copy-paste test cases without adapting them. Reused test cases from a previous release may reference outdated UI, removed fields, or changed business rules.
- Do not rely on a single tester's knowledge. If only one person knows how to test a critical module, that is a risk, not a strength. Document the knowledge in test cases and runbooks.
Tools Comparison
Tool | Type | Best For | Traceability | Defect Integration |
|---|---|---|---|---|
Jira + Zephyr Scale | Test management plugin | Teams already using Jira | Requirement linking via Jira | Native Jira integration |
TestRail | Standalone test management | Dedicated QA teams needing detailed reporting | Built-in requirement coverage | Integrates with Jira, Bugzilla, etc. |
Azure DevOps Test Plans | Integrated ALM | Microsoft-stack teams | Native work item linking | Native Azure Boards integration |
qTest | Enterprise test management | Large organizations with complex compliance needs | Requirement and release traceability | Integrates with Jira, Rally |
Xray for Jira | Test management plugin | Agile teams wanting tight Jira integration | Native Jira linking | Native Jira integration |
Choose based on your existing toolchain, team size, and reporting needs. No tool compensates for a weak process, but the right tool can reduce the friction of following a good one.
Real-World Example
⚠️ Disclaimer: The following scenario is an illustrative example based on typical industry patterns. The specific metrics are hypothetical estimates designed to demonstrate realistic outcomes, not measured data from a documented project. They should not be cited as factual benchmarks.
Context
A mid-sized fintech company with a 12-person QA team was running manual testing across three Scrum teams. Each team had its own way of writing test cases, logging defects, and reporting results. There was no shared template, no consistent defect lifecycle, and no standardized test summary format.
Challenge
Sprint retrospectives repeatedly surfaced the same problems: defects were being closed without retesting verification, and roughly 30% of closed defects were later reopened. Test summary reports varied so widely in format that stakeholders could not compare quality status across teams. New testers took weeks to become productive because there was no documented workflow to follow.
Solution
The test lead introduced a standardized manual testing workflow based on ISO/IEC/IEEE 29119-3:2021 documentation templates [5] and ISTQB terminology [6]:
- Unified test case template — All teams adopted a single template with mandatory fields (preconditions, test data, expected result, requirement link).
- Defined defect lifecycle — A six-state lifecycle (New → Assigned → In Progress → Fixed → Retested → Closed/Reopened) was enforced in Jira.
- Mandatory retesting verification — No defect could be moved to Closed without a tester executing the original test case and logging the retest result.
- Standardized test summary report — A one-page template was created with fixed sections: scope, execution summary, defect summary, risk items, and go/no-go recommendation.
Results (Illustrative Estimates)
- Defect reopen rate dropped from an illustrative 30% to approximately 8% within three sprints.
- Test summary reporting time decreased by roughly 60%, as testers no longer had to invent a format each sprint.
- New tester onboarding time shortened from approximately three weeks to one week, because the documented workflow served as a self-service training guide.
- Stakeholder confidence in release decisions improved, as measured by a reduction in post-release escalations.
Key Takeaways
- Standardization does not mean rigidity. The templates gave teams a consistent baseline while allowing feature-specific customization.
- Enforcing retesting verification had the single largest impact on defect quality.
- A one-page test summary report was more useful to stakeholders than the detailed multi-page documents it replaced.