



You have run thousands of test cases. Every regression suite is green. Performance benchmarks look solid. Then a stakeholder walks into the go-live meeting and says, "I never approved this." The release stalls, tempers rise, and your team scrambles to figure out who was supposed to sign off—and on what. This scenario plays out more often than anyone likes to admit. The acceptance phase exists precisely to prevent it, yet many teams treat it as a rubber stamp rather than a structured quality gate. This article gives you the concrete workflows, checklists, and decision criteria you need to run the acceptance phase as a disciplined, repeatable process inside the STLC.
What Is the Acceptance Phase?
The acceptance phase is the final testing stage in the STLC where stakeholders verify that the delivered system meets agreed business requirements and is ready for production deployment. It sits after system testing and integration testing, and its primary output is a formal go or no-go decision.
ISO/IEC/IEEE 29119-2 defines test processes that include completion criteria and exit conditions applicable to this phase [1]. The ISTQB CTFL v4.0 syllabus positions acceptance testing as a distinct test level focused on validating the system against user needs and business objectives [2].
Why the Acceptance Phase Matters for QA Teams
If you are a QA lead or SDET, you might wonder why you should care about what looks like a business activity. Here is why: the acceptance phase is where testing accountability meets organizational accountability. A poorly run acceptance phase creates three problems you will feel directly:
- Escaped defects. Without structured acceptance criteria validation, critical business-logic gaps reach production.
- Blame cycles. When there is no documented sign-off trail, QA becomes the default scapegoat for post-release failures.
- Rework. Vague acceptance often leads to scope disputes that send features back through the entire test cycle.
The acceptance phase protects your team's work by ensuring that what you tested against is what the business actually needs—and that the business formally acknowledges it.
Acceptance Criteria Definition: Getting the Foundation Right
The acceptance phase can only succeed if the acceptance criteria were defined correctly at the start of the project or sprint. Poorly written criteria are the single most common root cause of acceptance phase failures.
What Good Acceptance Criteria Look Like
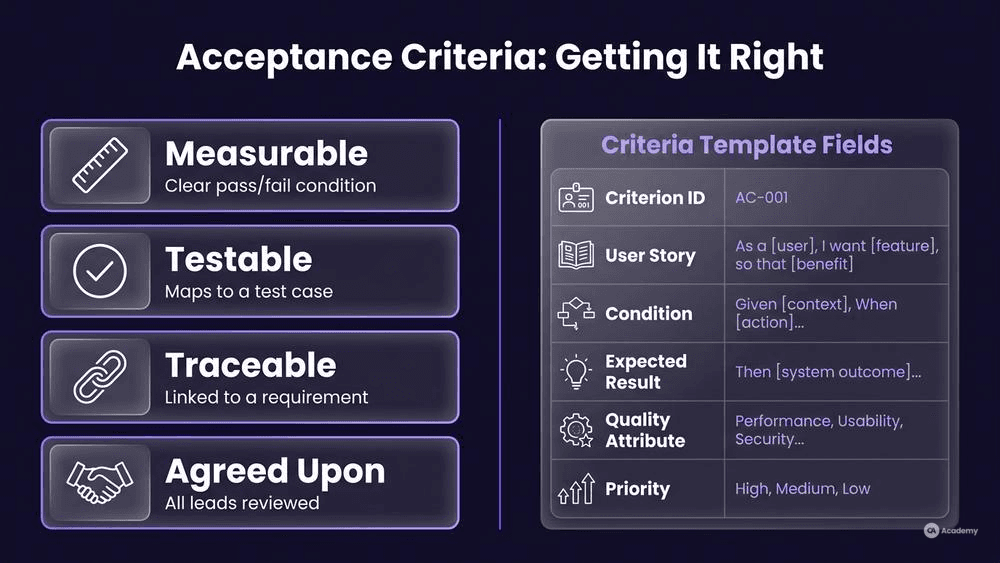
Good acceptance criteria share four properties:
- Measurable. Each criterion has a clear pass/fail condition. "The system should be fast" fails. "Search results load within 2 seconds for datasets under 10,000 records" passes.
- Testable. You can design a test case directly from the criterion without interpretation.
- Traceable. Each criterion maps to a business requirement or user story.
- Agreed upon. Product owner, QA lead, and development lead have all reviewed and approved the criteria before testing begins.
ISO/IEC 25010 provides a quality model that helps teams structure acceptance criteria around characteristics such as functional suitability, performance efficiency, usability, reliability, and security [3]. Using this model as a checklist ensures you do not miss entire quality dimensions.
Acceptance Criteria Template
Use this template when drafting criteria with your product owner:
Field | Example |
|---|---|
Criterion ID | AC-042 |
User Story | US-117: As a customer, I can reset my password via email |
Condition | User clicks "Forgot password," enters registered email, receives reset link within 60 seconds |
Expected Result | Reset link is valid for 24 hours, single-use, and invalidates previous links |
Quality Attribute | Functional suitability, Security |
Priority | Must-have |
Verification Method | Manual + automated E2E test |
How to Run the Acceptance Phase Step by Step
Prerequisites and Setup
Before you begin acceptance testing activities, confirm these prerequisites:
- All system and integration test cycles are complete with an agreed exit status.
- Acceptance criteria are documented, reviewed, and baselined.
- A dedicated acceptance test environment mirrors production configuration.
- Test data reflects realistic production scenarios (anonymized if needed).
- Stakeholder availability is confirmed for the acceptance window.
- Acceptance test plan is approved, including scope, schedule, and roles.
ISO/IEC/IEEE 29119-3 provides templates for test plans and test completion reports that you can adapt for acceptance documentation [4].
Step 1: Conduct an Entry Review
Hold a 30-minute meeting with the product owner, QA lead, and tech lead. Walk through the entry checklist above. If any prerequisite is not met, do not start. Document the gap and assign an owner with a deadline. Starting acceptance testing on an environment that does not match production, or without finalized criteria, virtually guarantees a failed phase.
Step 2: Execute Acceptance Tests
Run your acceptance test suite—both manual exploratory sessions led by business users and automated functional checks driven by QA. Track results in real time. For each test case, record:
- Pass / Fail / Blocked status
- Defect ID for any failure (linked to your defect tracker)
- Severity and priority classification
- Screenshot or log evidence
Step 3: Triage Failures
Not every failure blocks the release. Conduct a triage session within 24 hours of test completion. Classify each defect:
- Release-blocking: The defect violates a must-have acceptance criterion or introduces a security or data-integrity risk. The release cannot proceed until it is resolved.
- Acceptable with workaround: The defect affects a non-critical flow and a documented workaround exists. The product owner formally accepts the risk.
- Deferred: The defect is cosmetic or affects an edge case outside the acceptance scope. It enters the backlog with an agreed priority.
Step 4: Produce the Acceptance Test Completion Report
Summarize results in a structured report. Include: total tests executed, pass/fail/blocked counts, open defect summary by severity, environment details, and a clear recommendation (accept / conditionally accept / reject). This report becomes the input to the stakeholder approval process.
Common Pitfalls
- Testing in a non-production-like environment. Configuration drift between acceptance and production environments is a frequent source of false confidence.
- Skipping the entry review. Teams under deadline pressure often jump straight into testing. This almost always results in blocked tests and wasted cycles.
- Letting developers run acceptance tests. Acceptance testing validates the system from a user or business perspective. The people who built it are typically not the right people to accept it. The ISTQB CTFL syllabus explicitly distinguishes between test levels and the independence of testing [2].
Stakeholder Approval Process
The stakeholder approval process is where testing results translate into a business decision. This is not a QA-only activity. Your role as a QA professional is to present evidence; the decision authority belongs to the product owner or business sponsor.
Approval Workflow
- QA lead distributes the acceptance test completion report to all designated approvers at least 48 hours before the go-live decision meeting.
- Each approver reviews the report and raises questions or concerns asynchronously (via your project management tool or email).
- Go-live decision meeting. All approvers attend. QA presents a summary of results, highlights open risks, and walks through any conditionally accepted defects.
- Formal sign-off. Each approver records their decision: Approve, Approve with Conditions, or Reject. Use a sign-off matrix:
Approver Role | Name | Decision | Conditions (if any) | Date |
|---|---|---|---|---|
Product Owner | — | Approve with Conditions | Defect #347 fix by Day 3 post-launch | — |
QA Lead | — | Approve | — | — |
IT Operations | — | Approve | Monitoring dashboard configured | — |
Security Officer | — | Reject | Pen test finding #12 unresolved | — |
- If any approver rejects: The release does not proceed. Document the rejection reason, assign remediation, and schedule a follow-up review.
Who Should Be an Approver?
At minimum: the product owner (business accountability), QA lead (testing accountability), IT operations or DevOps lead (deployment readiness), and a security representative for systems handling sensitive data. In regulated industries, compliance or legal reviewers may also be required.
Go-Live Decision Criteria and System Readiness Review
The system readiness review is the final checkpoint before deployment. It evaluates whether the system, the organization, and the operational support structure are all prepared for production.
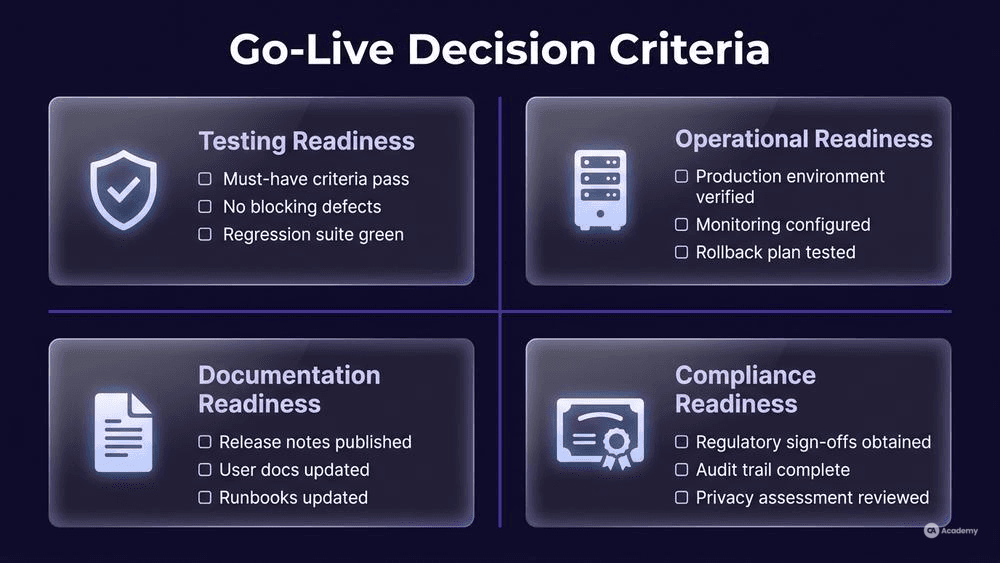
Go-Live Decision Criteria Checklist
Use this checklist in your go-live decision meeting:
Testing Readiness
- All must-have acceptance criteria pass.
- No open release-blocking defects.
- Conditionally accepted defects have documented workarounds and fix deadlines.
- Regression suite executed with no new failures introduced.
Operational Readiness
- Production environment provisioned and configuration-verified.
- Monitoring and alerting configured (application, infrastructure, business KPIs).
- Rollback plan documented and tested.
- Support team briefed on new features and known issues.
Documentation Readiness
- Release notes published.
- User documentation or help center updated.
- Runbooks updated for operations team.
Compliance Readiness (where applicable)
- Regulatory sign-offs obtained.
- Audit trail for all test evidence is complete and accessible.
- Data privacy impact assessment reviewed.
When to Say No
Saying no to a release under pressure is one of the hardest things a QA lead does. Here are conditions where you should recommend rejection, even if stakeholders push back:
- A must-have acceptance criterion fails with no viable workaround.
- The acceptance test environment deviated significantly from production, making results unreliable.
- A security vulnerability with a high severity classification remains unpatched.
- The rollback plan has not been validated.
Frame your recommendation in terms of risk, not opinion. "We have an unresolved authentication bypass that exposes customer data" is harder to override than "I don't feel comfortable with this release."
Best Practices (and What Not to Do)
Do This
- Automate repeatable acceptance checks. If an acceptance criterion is stable across sprints, automate it. This frees business users to focus on exploratory validation of new functionality.
- Version your acceptance criteria. Treat them like code—track changes, require reviews, and baseline each release's criteria set.
- Separate UAT from acceptance phase governance. UAT is a testing activity. The acceptance phase includes UAT but also encompasses the approval workflow, readiness review, and sign-off process. Conflating them leads to gaps.
- Run a dry-run sign-off early. Midway through the sprint or project, walk approvers through the sign-off process with a mock report. This surfaces misunderstandings about roles and criteria before the real deadline.
- Track acceptance phase metrics over time. Measure: number of acceptance cycles per release, defect escape rate post-acceptance, time from test completion to sign-off, and percentage of releases requiring re-acceptance.
What Not to Do
- Do not skip acceptance testing under schedule pressure. A delayed release is recoverable. A production incident due to untested acceptance criteria damages user trust and typically costs more in engineering time than the delay would have.
- Do not treat sign-off as implicit. Silence from a stakeholder is not approval. Require an explicit decision from every designated approver.
- Do not accept vague acceptance criteria. If a criterion says "system performs well under load," send it back. Ambiguity at this stage guarantees disputes during acceptance.
- Do not let the acceptance phase become a second round of system testing. If your acceptance phase routinely uncovers functional defects that should have been caught earlier, your system test process has a gap. Fix the root cause.
Tools Comparison
Tool | Primary Use in Acceptance Phase | Strengths | Considerations |
|---|---|---|---|
Jira | Defect tracking, acceptance workflow management | Highly configurable workflows, strong integration ecosystem | Requires discipline to maintain custom acceptance fields |
Azure DevOps | Test plans, sign-off tracking, pipeline integration | Native integration with CI/CD pipelines, built-in test management | Strongest in Microsoft-centric environments |
TestRail | Acceptance test case management and reporting | Purpose-built for test management, clear pass/fail dashboards | Separate tool from project management, requires integration |
Zephyr Scale | Test execution and traceability within Jira | Lives inside Jira, strong traceability to requirements | Adds complexity to Jira instance; licensing costs scale with team size |
Confluence | Acceptance criteria documentation, sign-off records | Familiar to most teams, supports structured templates | Not a test management tool; manual tracking of execution status |
Real-World Example
⚠️ Disclaimer: The following scenario is an illustrative example based on typical industry patterns. The specific metrics are hypothetical estimates designed to demonstrate realistic outcomes, not measured data from a documented project. They should not be cited as factual benchmarks.
Context
A mid-sized financial services company was preparing to launch a redesigned customer onboarding portal. The project involved integration with three external APIs (identity verification, credit scoring, document management) and needed to comply with internal data governance policies.
Challenge
Previous releases had suffered from unclear acceptance ownership. Business analysts assumed QA sign-off was sufficient. QA assumed the product owner had approved the business logic. Operations had no visibility into what was changing. The result: post-release hotfixes on two of the last three deployments, each requiring weekend work from the engineering team.
Solution
The QA lead introduced a structured acceptance phase following the workflow described in this article:
- Defined a sign-off matrix with four mandatory approvers: product owner, QA lead, DevOps lead, and compliance officer.
- Baselined acceptance criteria two sprints before the release, using the template format above. Each criterion was mapped to a user story and a quality attribute from ISO/IEC 25010 [3].
- Configured a dedicated acceptance environment that mirrored production, including all three external API integrations via sandboxed endpoints.
- Ran a dry-run sign-off one sprint before release to familiarize approvers with the process.
- Executed 142 acceptance test cases (94 automated, 48 manual business-user scenarios) over a three-day window.
- Triaged 11 defects: 2 classified as release-blocking (both fixed within 48 hours), 4 accepted with workarounds, 5 deferred to the next sprint.
Results (Illustrative)
- The release deployed on schedule with formal sign-off from all four approvers.
- Post-release production incidents dropped by an illustrative 70% compared to the previous three releases.
- The acceptance phase added three calendar days to the release timeline but eliminated an estimated five days of post-release firefighting per previous release.
- Stakeholder confidence in the release process improved, as measured by an internal satisfaction survey sent to business sponsors.
Key Takeaways
- A sign-off matrix eliminates ambiguity about who holds decision authority.
- Dry-run sign-offs before the actual acceptance window reduce process friction significantly.
- Dedicated acceptance environments, while costly to maintain, prevent the false confidence that comes from testing in a shared or degraded environment.
- Triaging defects by release impact—not just severity—keeps the go-live decision grounded in business risk.