



A defect sits in your backlog marked "New." No one picks it up. By the time someone notices, three days have passed, the sprint is half over, and the developer who could fix it fastest is deep in another feature. Sound familiar? Knowing how to assign defects quickly and to the right person is one of the most underrated skills in QA management. Poor assignment decisions create bottlenecks, inflate resolution times, and erode trust between testing and development. This article gives you a repeatable workflow, a ready-to-use checklist, and practical templates to make defect assignment fast and accurate. You will walk away with a process you can plug into your next sprint planning session.
What Does It Mean to Assign Defects?
To assign defects means to designate a single accountable owner for each reported bug so it moves through the defect lifecycle stages — from "New" through "Assigned," "In Progress," "Fixed," "Verified," and "Closed" — without stalling. The ISO/IEC/IEEE 29119-2 standard defines test incident reporting and management activities that include identifying, logging, and routing defects to the appropriate party for resolution [1]. The ISTQB glossary similarly treats defect management as a structured process of recognition, investigation, and action [2].
Why It Matters for QA
Unassigned or misassigned defects are the leading cause of stale backlogs. When nobody owns a bug, nobody fixes it. When the wrong person owns it, you get unnecessary re-assignments that chew up time.
Good assignment practices reduce back-and-forth, shorten the feedback loop between testers and developers, and keep the sprint backlog honest. They also feed your resolution time metrics: if you cannot tell who received a defect and when, you cannot measure how long fixes actually take.
Think of defect assignment as the routing layer in your bug-tracking system. A packet without a destination address never arrives. The same is true for a defect record without a clear owner.
How to Assign Defects: A Step-by-Step Workflow
Below is a five-step workflow you can adapt for any team size — from a three-person startup squad to a multi-team enterprise program.
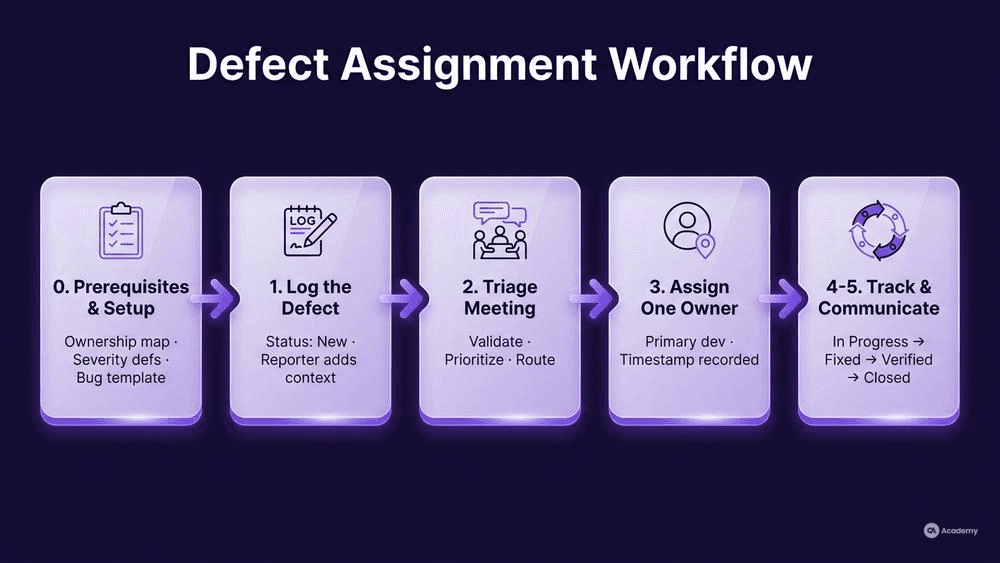
Step 0: Prerequisites and Setup
Before you assign a single defect, make sure these foundations are in place:
- Component ownership map. A living document — a wiki page or spreadsheet — that maps each application module or microservice to its primary and backup developer. This is the backbone of developer ownership tracking.
- Severity and priority definitions. Agree on what "Critical," "Major," "Minor," and "Trivial" mean in your context. Write them down so triage decisions are consistent.
- Bug report template. Enforce a minimum data set: steps to reproduce, expected vs. actual result, environment, severity, and attachments (logs, screenshots). Incomplete reports slow assignment because the triager has to chase missing information.
Step 1: Log the Defect
The tester — or automated pipeline — creates a defect record in the tracking tool (Jira, Azure DevOps, Bugzilla, etc.) with status "New." At this point, the defect has no owner. The reporter's job is to provide enough context so the triager can route it correctly.
Step 2: Triage at the Defect Triage Meeting
A defect triage meeting is a short, time-boxed ceremony (typically 15–30 minutes) where the QA lead, a dev lead, and optionally a product owner review all "New" defects. The ISO/IEC/IEEE 29119-3 standard describes incident report content and fields that support this kind of structured review [3].
During triage, the team:
- Confirms the defect is valid (not a duplicate or a misunderstanding of requirements).
- Sets or adjusts severity and priority using the bug prioritization matrix (see next section).
- Identifies the responsible component via the ownership map.
- Assigns the defect to a specific individual.
Hold this meeting daily during active sprints and at least three times per week during stabilization phases.
Step 3: Assign to a Single Owner
One defect, one owner. Splitting a single defect across multiple assignees frequently leads to confusion about who is ultimately accountable — each person may assume the other is handling it. Look up the component ownership map, find the primary developer, and set that person as the assignee. If the primary developer is unavailable (on leave, overloaded), assign to the backup.
Update the defect status from "New" to "Assigned" and record the timestamp. This timestamp is the starting point for your resolution time metrics.
Step 4: Communicate and Confirm
Send a brief notification — most tools do this automatically — and confirm in the daily standup that the developer has seen the assignment. If the developer believes the defect belongs to a different component, the re-routing must happen within the same business day to avoid drift.
Step 5: Track Through Defect Lifecycle Stages
Monitor the defect as it moves through "In Progress," "Fixed," "Verified" (by QA), and "Closed." If a defect stays in "Assigned" for longer than your team's agreed threshold (commonly 24–48 hours), flag it in the next standup. Stale assignments are almost as harmful as no assignment at all.
Bug Prioritization Matrix
A bug prioritization matrix cross-references severity (technical impact) with business priority (urgency from the user's or product owner's perspective). Here is a template you can copy into your wiki:
Priority: Critical | Priority: High | Priority: Medium | Priority: Low | |
|---|---|---|---|---|
Severity: Critical | Fix immediately (P1) | Fix within 4 hours (P1) | Fix this sprint (P2) | Fix this sprint (P2) |
Severity: Major | Fix within 4 hours (P1) | Fix this sprint (P2) | Fix next sprint (P3) | Backlog (P4) |
Severity: Minor | Fix this sprint (P2) | Fix next sprint (P3) | Backlog (P4) | Backlog (P4) |
Severity: Trivial | Fix next sprint (P3) | Backlog (P4) | Backlog (P4) | Won't fix / Backlog |
Use the P-level output from this matrix during the defect triage meeting to decide assignment order. P1 defects get assigned first and to your most experienced developer for that component.
Best Practices for Developer Ownership Tracking
Developer ownership tracking is the practice of maintaining a clear, current record of who is responsible for each part of the codebase, and using that record to route defects without guesswork.
- Keep the ownership map version-controlled. Store it alongside the codebase or in a wiki that is linked from your project's README. Stale ownership maps are worse than none because they route defects to people who moved teams months ago.
- Assign backup owners. Every component needs a primary and a secondary owner. If only one person can fix a module, you have a bus-factor risk and an assignment bottleneck.
- Review quarterly. When teams reorganize or people change roles, update the map immediately — do not wait for the next planning increment.
- Use automation. Tools like GitHub CODEOWNERS or Jira automation rules can auto-suggest assignees based on the files or components affected in a defect report.
Resolution Time Metrics Worth Tracking
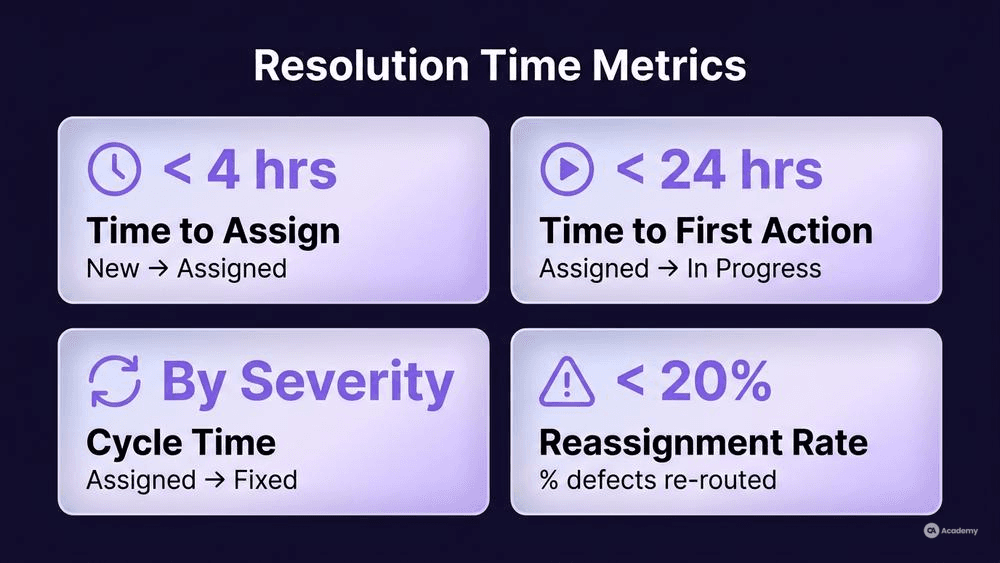
You cannot improve what you do not measure. These four metrics give you a clear picture of assignment health:
Metric | What It Measures | Target (Typical) |
|---|---|---|
Time to Assign | Hours from "New" to "Assigned" | < 4 business hours |
Time to First Action | Hours from "Assigned" to "In Progress" | < 24 hours |
Cycle Time | Hours from "Assigned" to "Fixed" | Varies by severity tier |
Reassignment Rate | % of defects reassigned after initial assignment | Team-defined threshold |
A high reassignment rate is a strong signal that your component ownership map is inaccurate or that triage decisions are being made without enough technical context. Track this metric sprint over sprint and investigate spikes.
What NOT to Do: Common Anti-Patterns
Knowing what to avoid can be just as valuable as knowing the right workflow. Here are the most damaging anti-patterns in defect assignment:
- Assigning to a group or queue instead of a person. A group assignment often means no one treats the defect as their personal responsibility. Always name a human.
- Skipping triage and auto-assigning by keyword. Keyword-based routing sounds efficient, but a defect summary mentioning "login" does not always belong to the authentication team. Automated suggestions help; automated final assignment without review can misroute bugs.
- Hoarding defects on one senior developer. If one person is assigned 40% of all defects, they become a bottleneck regardless of their skill. Distribute load using the prioritization matrix and ownership map together.
- Letting the reporter self-assign the fix. Testers reporting defects should generally not assign them to themselves for resolution (unless they are also contributing code). The triage meeting decides routing.
- Ignoring re-opened defects. A defect that fails verification and is re-opened must be re-assigned explicitly. Do not assume the original developer will notice the status change.
Tools Comparison
Tool | Auto-Assignment | Ownership Mapping | Resolution Time Dashboards | Triage Workflow Support |
|---|---|---|---|---|
Jira | Via automation rules | Plugin-based (e.g., Component Lead) | Built-in + third-party (EazyBI) | Kanban/Scrum boards |
Azure DevOps | Via work-item rules | Area path owners | Built-in Analytics views | Queries + dashboards |
Bugzilla | Basic (default assignee per component) | Component-level default owners | Limited (needs reporting add-ons) | Flags and tracking flags |
Linear | Automated via team/project settings | Team-based ownership | Built-in cycle analytics | Triage views |
GitHub Issues | Via CODEOWNERS + Actions | CODEOWNERS file | Limited without third-party | Project boards |
Choose the tool that matches your team's existing ecosystem. The best defect tracking tool is the one your developers actually check daily.
Real-World Example
⚠️ Disclaimer: The following scenario is an illustrative example based on typical industry patterns. The specific metrics are hypothetical estimates designed to demonstrate realistic outcomes, not measured data from a documented project. They should not be cited as factual benchmarks.
Context
A mid-size fintech company runs a payment processing platform with 12 microservices. The QA team of six testers reports defects into Jira, but there is no formal triage process. Defects are assigned by whoever notices them first, usually the QA lead during a weekly backlog grooming session.
Challenge
The team notices that roughly 35% of defects end up being reassigned at least once because the initial assignment goes to the wrong developer. The average time from "New" to "Assigned" sits around 18 hours. Critical payment-flow bugs sometimes wait over a day before anyone picks them up, leading to escalations from the operations team.
Solution
The team implements the workflow described in this article:
- Creates a component ownership map linking each microservice to a primary and backup developer.
- Introduces a daily 15-minute defect triage meeting with the QA lead, one rotating dev lead, and the product owner (optional attendance).
- Adopts the bug prioritization matrix to standardize severity and priority alignment.
- Configures Jira automation to flag any defect in "New" status for more than four hours.
Results
After two full sprints of using the new process:
- Time to Assign drops from approximately 18 hours to about 3 hours.
- The reassignment rate decreases from roughly 35% to around 10%.
- Critical defects are consistently picked up within the same business day.
- Developer satisfaction with the triage process improves based on retrospective feedback.
Key Takeaways
- A daily, time-boxed defect triage meeting can significantly reduce assignment delays without adding heavy process overhead.
- An up-to-date component ownership map tends to be the single most impactful artifact for accurate routing.
- Automation should support the process (flagging, suggesting), but a human triager typically makes better final routing decisions than keyword-based rules alone.