



Your test suite passes locally every time. Then a developer pushes a change, nobody runs the regression pack, and a critical defect slips into staging. Sound familiar? This is the exact gap Jenkins fills for QA teams. Jenkins is an open-source build automation server that orchestrates your test execution automatically—on every commit, on every pull request, on a schedule you define. In this article, you will learn how to configure a Jenkins CI/CD pipeline specifically for QA workflows, from Jenkinsfile pipeline scripts to webhook trigger setup and master-agent architecture. Whether you are running Selenium suites, API tests, or performance checks, you will walk away with a pipeline you can implement this sprint.
What Is Jenkins?
Jenkins is an open-source build automation server written in Java that automates the build, test, and deployment phases of software delivery. It supports most major CI/CD workflows through a plugin ecosystem of over 1,800 integrations, covering everything from source control to test reporting to container orchestration.
At its core, Jenkins watches your repository for changes, triggers a pipeline, executes your defined stages (build, test, deploy), and reports results. What makes it relevant for QA specifically is that those "test" stages can be anything: unit tests, integration suites, end-to-end Selenium runs, API contract checks, or performance benchmarks.
Why Jenkins Matters for QA Teams
Manual test execution does not scale. As your codebase grows, so does the regression surface, and most QA teams cannot keep pace by running suites manually before every release. Jenkins solves this by making test execution event-driven rather than human-driven.
A well-structured CI/CD pipeline configuration gives your QA team three things:
- Consistency. The same tests run in the same order with the same environment configuration on every build—eliminating "it works on my machine" problems.
- Speed. Parallel execution across multiple agents can reduce a four-hour regression suite to under an hour.
- Traceability. Every test run is linked to a specific commit, branch, and build number, making root-cause analysis significantly faster.
Continuous testing, as emphasized by ISO/IEC/IEEE 29119-2:2021, is a core activity within the test process that should be integrated throughout the software development lifecycle [1]. Jenkins provides the automation layer that makes this integration practical for teams of any size.
How to Set Up a Jenkins CI/CD Pipeline for Testing
This section is your step-by-step playbook. We will go from a fresh Jenkins instance to a working QA pipeline.
Prerequisites and Initial Setup
Before writing your first pipeline, make sure you have:
- Jenkins installed (LTS version recommended) on a dedicated server or container.
- JDK 11 or 17 on the controller node.
- Source control configured (GitHub, GitLab, or Bitbucket with credentials stored in Jenkins Credential Manager).
- Test frameworks ready in your repository (e.g., pytest, TestNG, Cypress, or JUnit).
Install these plugins from Manage Jenkins → Plugins:
- Pipeline (core pipeline support)
- Git (SCM integration)
- JUnit or HTML Publisher (test reporting)
- Allure (if you use Allure for rich test reports)
- Blue Ocean (modern pipeline visualization, optional but recommended)
Step 1: Create a Jenkinsfile Pipeline Script
A Jenkinsfile is a text file checked into your repository that defines your pipeline as code. This is the approach most QA teams should use because it keeps pipeline configuration version-controlled alongside your tests.
Create a file named Jenkinsfile in your repository root:
`groovy // Jenkinsfile — Declarative Pipeline for QA test execution // This pipeline runs on any available agent, checks out code, // executes tests, and publishes results.
pipeline { agent any // Runs on any available Jenkins agent
environment { // Sets a project-wide variable accessible in all stages TEST_ENV = 'staging' }
stages { stage('Checkout') { steps { // Pulls the latest code from the configured SCM checkout scm } }
stage('Setup') { steps { // Installs test dependencies; adjust for your stack sh 'pip install -r requirements.txt' } }
stage('Run Tests') { steps { // Executes pytest and generates a JUnit-format XML report // --junitxml flag outputs results Jenkins can parse sh 'pytest tests/ --junitxml=results/report.xml' } }
stage('Publish Results') { steps { // Tells Jenkins to read the XML report and display // pass/fail trends on the build dashboard junit 'results/report.xml' } } }
post { failure { // Sends a Slack notification only when the build fails // Requires the Slack Notification plugin to be configured slackSend channel: '#qa-alerts', message: "Pipeline FAILED: ${env.JOBNAME} #${env.BUILDNUMBER}" } } } `
This Jenkinsfile gives you a four-stage pipeline: checkout, setup, test execution, and result publishing. The post block handles failure notifications, so your team knows immediately when something breaks.
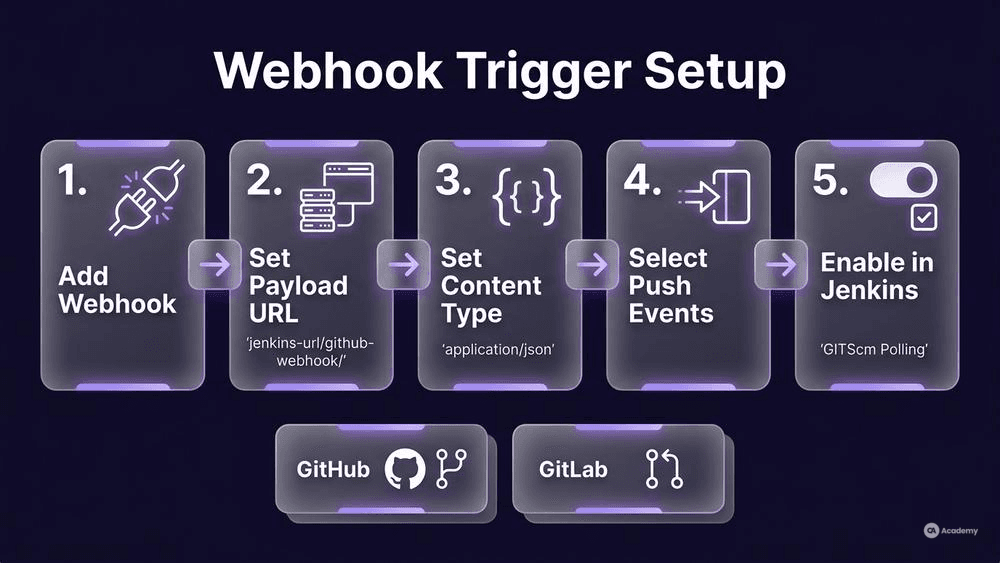
Step 2: Configure Webhook Trigger Setup
Polling your repository wastes resources. Instead, configure a webhook so your SCM notifies Jenkins the moment a push occurs.
For GitHub:
- In your GitHub repository, go to Settings → Webhooks → Add webhook.
- Set the Payload URL to
https://your-jenkins-url/github-webhook/. - Set Content type to
application/json. - Select "Just the push event" (or add pull request events if you want PR-triggered builds).
- In Jenkins, open your pipeline job → Configure → Build Triggers → check GitHub hook trigger for GITScm polling.
For GitLab:
- Go to your project's Settings → Webhooks.
- Set the URL to
https://your-jenkins-url/project/your-job-name. - Select Push events and Merge request events.
- In Jenkins, use the GitLab plugin and enable Build when a change is pushed to GitLab.
Now every push automatically triggers your QA pipeline—no manual intervention, no forgotten test runs.
Step 3: Set Up Master-Agent Architecture
Running all tests on your Jenkins controller is a bottleneck and a security risk. The master-agent architecture distributes workloads across dedicated machines.
Controller (master): Manages scheduling, configuration, and the UI. It should not execute builds.
Agents (nodes): Dedicated machines (physical, VMs, or containers) that execute pipeline stages.
To add an agent:
- Go to Manage Jenkins → Nodes → New Node.
- Choose Permanent Agent (for VMs) or configure Docker Cloud (for dynamic containers).
- Assign labels like
linux,windows,browser-tests, orperformance. - In your Jenkinsfile, target specific agents using labels:
`groovy // Targets only agents labeled 'browser-tests' — ensures // the stage runs on a machine with browsers installed stage('UI Tests') { agent { label 'browser-tests' } steps { sh 'npx cypress run' } } `
This approach lets you run browser tests on agents with Chrome and Firefox installed, API tests on lightweight containers, and performance tests on high-memory machines—all in parallel.
Step 4: Define Quality Gates
Quality gates determine whether a pipeline should pass or fail. Rather than relying on a fixed pass-rate percentage, define gates based on risk.
The key principle: fail the pipeline if any release-blocking or critical test fails, if a mandatory suite does not complete, or if the team's own agreed threshold is crossed. Remaining failures should be triaged and accepted by the release owner. This approach aligns with risk-based testing principles in ISO/IEC/IEEE 29119-4:2021 [2].
Add a gate to your Jenkinsfile:
`groovy stage('Quality Gate') { steps { script { // Reads JUnit results to check for critical-severity failures // The 'Critical' prefix is a naming convention your team defines // in test names, e.g., "CriticalLoginFlowShouldSucceed" def criticalFailures = currentBuild.rawBuild .getAction(hudson.tasks.junit.TestResultAction.class) ?.getResult()?.getFailedTests() ?.findAll { it.getName().contains('Critical') }
// If any test marked 'Critical' failed, abort the pipeline if (criticalFailures && criticalFailures.size() > 0) { error "Release blocked: ${criticalFailures.size()} critical test(s) failed." } } } } `
Best Practices for QA Pipeline Configuration
After working with Jenkins pipelines across multiple sprint cycles, patterns emerge. Here are the practices that tend to yield the most reliable results:
1. Keep Jenkinsfiles in the repository, not in the Jenkins UI. Pipeline-as-code means your CI/CD configuration is version-controlled, peer-reviewed, and auditable—exactly like your test code.
2. Use Jenkins shared libraries for reusable logic. If multiple projects share the same test reporting or notification steps, extract them into a shared library. This keeps individual Jenkinsfiles clean and reduces duplication.
`groovy // In your shared library (vars/qaNotify.groovy): // This function encapsulates the notification logic so every // team's Jenkinsfile can call qaNotify('channel') instead of // duplicating Slack/email configuration. def call(String channel) { slackSend channel: channel, message: "Build ${currentBuild.result}: ${env.JOBNAME} #${env.BUILDNUMBER}" } `
3. Parallelize test stages. Split your suite by type (unit, API, UI, performance) and run them concurrently across labeled agents.
4. Archive test artifacts. Store screenshots, logs, and HTML reports as build artifacts so you can debug failures without re-running the pipeline.
5. Set timeouts. Add timeout(time: 30, unit: 'MINUTES') to stages to prevent hung processes from blocking your agents indefinitely.
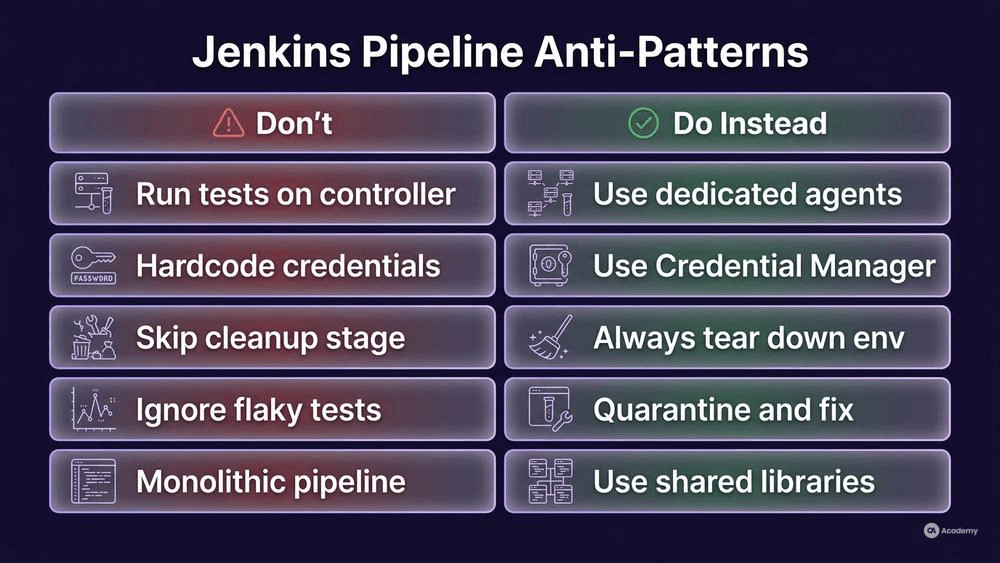
What NOT to Do: Common Anti-Patterns
Avoiding mistakes is often more valuable than learning best practices. These are the patterns that most frequently cause pipeline instability for QA teams:
- Do NOT run tests on the controller node. This creates resource contention and security vulnerabilities. Controller nodes should schedule, not execute.
- Do NOT hardcode credentials in Jenkinsfiles. Use Jenkins Credential Manager and reference credentials by ID. Exposed secrets in version control are a security incident.
- Do NOT skip the cleanup stage. Test environments that are not torn down accumulate state. Stale browser sessions, dangling containers, and leftover test data cause flaky test results.
- Do NOT ignore flaky tests. A test that intermittently fails without a code change is not "passing." Quarantine it, investigate it, and fix it. Flaky tests erode trust in the entire pipeline.
- Do NOT create a single massive pipeline. If your Jenkinsfile exceeds 200 lines, break it into smaller pipelines or use shared libraries. Monolithic pipelines are difficult to debug and maintain.
Tools Comparison: Jenkins vs. Other CI/CD Servers
Jenkins is not the only option. Here is how it compares to other CI/CD tools commonly used by QA teams:
Feature | Jenkins | GitLab CI/CD | GitHub Actions | CircleCI |
|---|---|---|---|---|
Self-hosted option | Yes (primary mode) | Yes (GitLab Runner) | Yes (self-hosted runners) | Limited |
Cloud-hosted option | Via CloudBees | GitLab.com | GitHub.com | Yes (primary mode) |
Plugin ecosystem | 1,800+ plugins | Built-in features | Marketplace Actions | Orbs marketplace |
Pipeline as code | Jenkinsfile (Groovy) |
| YAML workflows | YAML config |
Master-agent scaling | Native, highly configurable | GitLab Runners | Runner groups | Resource classes |
Learning curve | Steeper (Groovy + admin) | Moderate | Lower (YAML-native) | Lower |
Best for QA teams when | You need maximum customization and self-hosted control | Your codebase already lives in GitLab | Your codebase is on GitHub and you want minimal setup | You want managed infrastructure with low ops overhead |
Jenkins stands out when your QA team needs deep customization—custom plugins, complex branching logic, or integration with legacy systems. If your organization has strong DevOps support, Jenkins can be the most flexible option. If your team is small and prefers managed infrastructure, GitHub Actions or CircleCI may be more practical.
Real-World Example
⚠️ Disclaimer: The following scenario is an illustrative example based on typical industry patterns. The specific metrics are hypothetical estimates designed to demonstrate realistic outcomes, not measured data from a documented project. They should not be cited as factual benchmarks.
Context
A mid-sized fintech company with a 12-person QA team runs a microservices platform with 15 services. Their test suite includes roughly 3,000 automated tests spanning unit, API, integration, and end-to-end UI checks.
Challenge
Before implementing Jenkins, the team relied on a manual nightly build process. A senior QA engineer would SSH into a server, pull the latest code, and trigger the test suite. This process had several problems:
- Test runs were inconsistent—different engineers configured the environment differently.
- Results were stored locally and rarely shared with the wider team.
- Feedback cycles were slow: developers learned about test failures the next morning at best.
- The full suite took roughly four hours on a single machine.
Solution
The team implemented a Jenkins-based CI/CD pipeline configuration with these components:
- Jenkinsfile pipeline scripts checked into each microservice repository.
- Webhook trigger setup via GitHub, triggering pipelines on every pull request.
- Master-agent architecture with 6 containerized agents: 2 for API tests, 2 for UI tests (with browsers), 1 for performance, and 1 spare.
- Parallel test execution across agents, splitting the 3,000 tests by type.
- Risk-based quality gates that blocked merges when any critical test failed, with remaining failures triaged by the test lead.
- Shared libraries for common reporting and Slack notification steps.
Results (Illustrative Estimates)
- Full regression execution dropped from roughly 4 hours to approximately 55 minutes through parallelization.
- Developer feedback time improved from next-day to within 1 hour of each push.
- The team estimated that environment-related false failures decreased by approximately 70% due to standardized agent configurations.
- Release confidence increased, with the team moving from biweekly to weekly releases.
Key Takeaways
- Pipeline as code is non-negotiable for reproducibility. Configuration drift between team members was the root cause of most inconsistent results.
- Parallelization delivers the largest time savings. Splitting by test type and distributing across labeled agents was the single most impactful change.
- Quality gates must be risk-based, not percentage-based. The team initially set a "95% pass rate" gate and quickly found it masked critical failures. Switching to "block on any critical failure" proved more effective.
- Start with a small pipeline and iterate. The team began with a simple three-stage pipeline and expanded over four sprints.