



You have wrapped up the final sprint. The product owner nods approvingly during the demo. Stakeholders say it "looks good." And then, two days after go-live, a critical workflow breaks in production because nobody pinned down what "accepted" actually meant. In many cases, the problem is not solely the testing itself — it is the absence of a structured acceptance test plan that ties every test activity to a clear, risk-based go/no-go decision. This article gives you a reusable framework for building that plan. You will walk away with concrete templates, an exit criteria checklist, and a stakeholder approval matrix you can adapt to your next release.
What Is an Acceptance Test Plan?
An acceptance test plan is a document — or a living artifact in your wiki — that defines what will be tested during acceptance testing, who owns each decision, and which criteria must be met before the release is approved. It bridges the gap between the development team's "done" and the business's "accepted."
ISO/IEC/IEEE 29119-3 provides a standardized template for test documentation, including the structure and content of test plans at various levels [1]. The ISTQB Foundation Level syllabus further distinguishes acceptance testing as a level focused on validating that the system meets business needs and is ready for deployment [2].
Why It Matters for QA
Without a dedicated acceptance test plan, teams often fall into one of two traps. Either they re-run the same regression suite and call it "UAT," or they hand the system to business users with no structured scenarios and hope for useful feedback.
A well-built plan prevents both failure modes by accomplishing three things:
- Scope clarity — It defines what is in scope for acceptance and, equally important, what is not.
- Decision authority — It names who can approve or block a release, removing ambiguity during crunch time.
- Traceability — It links acceptance criteria back to business requirements, so every test has a reason to exist.
The TMMi model identifies defined test planning as a foundational practice for process improvement; without it, testing activities tend to remain ad hoc and reactive [3].
How to Build an Acceptance Test Plan Step by Step
Prerequisites and Setup
Before you draft anything, gather these inputs:
- Business requirements or user stories with explicit acceptance criteria
- Risk assessment output (which features carry the highest business risk?)
- Test environment readiness confirmation — acceptance testing in an environment that does not mirror production often yields misleading results
- Data requirements — anonymized production data or synthetic datasets that cover real-world scenarios
A common pitfall here is starting the plan after development is "almost done." Ideally, you begin drafting the acceptance test plan during sprint planning or at the start of the release cycle, not at the end.
Step 1: Define the Scope
State what the acceptance test plan covers and what it excludes. Be specific. Instead of "test the new checkout flow," write:
In scope: Guest checkout, registered-user checkout, coupon application, payment via credit card and PayPal. Out of scope: Gift card redemption (deferred to next release), performance under peak load (covered by the performance test plan).
This section is where scope creep tends to begin, so treat it as a contract between QA and the product owner.
Step 2: Identify Acceptance Criteria per Feature
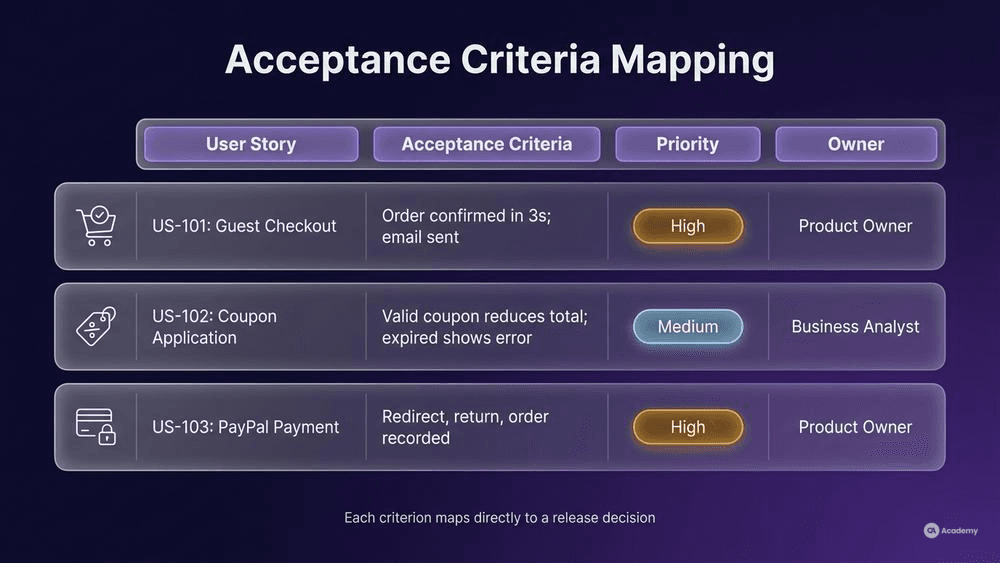
Map each feature or user story to its acceptance criteria. A simple table works well:
User Story | Acceptance Criteria | Priority | Owner |
|---|---|---|---|
US-101: Guest checkout | Order confirmed within 3 seconds; confirmation email sent | High | Product Owner |
US-102: Coupon application | Valid coupon reduces total; expired coupon shows error | Medium | Business Analyst |
US-103: PayPal payment | Redirect to PayPal, return to confirmation page, order recorded | High | Product Owner |
It is crucial that each field reflects an actual decision, not a placeholder copied from a template.
Step 3: Design Acceptance Test Cases
Derive test cases from the criteria above. Keep them business-readable. Acceptance tests are often executed or witnessed by non-technical stakeholders, so avoid implementation jargon.
Each test case should include:
- Preconditions (user state, data, environment)
- Steps (what the user does)
- Expected result (what the system should do)
- Pass/fail criteria (unambiguous — no "should look correct")
ISO/IEC/IEEE 29119-4 provides a catalogue of test techniques you can draw from when designing these cases, including equivalence partitioning and use-case testing, both of which map well to acceptance scenarios [4].
Step 4: Assign Roles and Responsibilities
Clarify who does what:
Role | Responsibility |
|---|---|
Product Owner | Approves scope, owns final go/no-go |
Business Analyst | Reviews test cases for business accuracy |
QA Lead | Coordinates execution, tracks defects |
End Users / SMEs | Execute or witness test cases |
Release Manager | Triggers deployment after approval |
Step 5: Define the Test Environment Readiness Criteria
Your test environment readiness checklist should confirm:
- Environment mirrors production configuration (OS, middleware, integrations)
- Test data is loaded and verified
- Third-party service stubs or sandboxes are functional
- Access credentials are distributed to all participants
Document this in the plan. If the environment is not ready, acceptance testing does not start — that is a prerequisite, not an afterthought.
Step 6: Establish the Timeline
Time-box acceptance testing. Open-ended UAT cycles tend to drift and lose stakeholder engagement. A typical sprint-aligned cadence might be:
- Day 1: Environment verification and test kickoff
- Days 2–4: Test execution
- Day 5: Defect triage, retest, and go/no-go decision
Exit Criteria Checklist
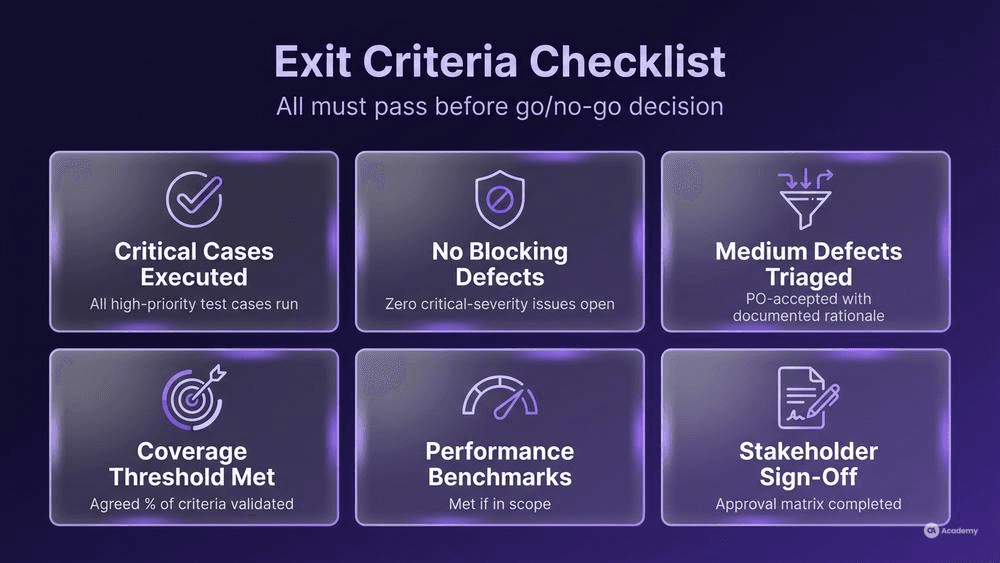
Exit criteria define when acceptance testing is done. Avoid vague statements like "all major bugs fixed." Instead, use risk-based criteria that your team has agreed on before testing begins.
A practical exit criteria checklist:
- [ ] All critical and high-priority test cases executed
- [ ] No open release-blocking or critical-severity defects remain
- [ ] Any open medium/low defects have been triaged and accepted by the product owner with documented rationale
- [ ] Test coverage against acceptance criteria meets the team's agreed threshold
- [ ] Performance benchmarks met (if in scope)
- [ ] Stakeholder sign-off obtained (see next section)
The ISTQB syllabus emphasizes that exit criteria should be defined during test planning, not invented at the end of execution when pressure to ship is highest [2].
A note on pass-rate thresholds: Avoid defining exit criteria as a fixed pass-rate percentage (e.g., "95% pass rate required"). A single failed critical test case is more meaningful than a hundred passed trivial ones. Base your criteria on risk severity: if any release-blocking test fails, the release does not proceed. Remaining failures are triaged, and the release owner accepts or rejects the residual risk.
Stakeholder Approval Matrix and Go/No-Go Decision
A go/no-go decision is only as reliable as the authority behind it. The stakeholder approval matrix removes ambiguity by defining who must approve, who is consulted, and who is informed.
Sample Stakeholder Approval Matrix
Stakeholder | Role in Decision | Authority |
|---|---|---|
Product Owner | Approver — must sign off | Can block release |
QA Lead | Recommender — presents test results and risk summary | Can recommend block |
Engineering Lead | Consulted — confirms technical readiness | Advisory |
Compliance / Legal | Approver (regulated industries) | Can block release |
Release Manager | Executor — triggers deployment | Cannot override block |
How the Go/No-Go Meeting Works
- QA Lead presents: test execution summary, open defects by severity, exit criteria status.
- Each approver states go, conditional go (with named conditions), or no-go.
- A single "no-go" from any approver with blocking authority halts the release.
- Decision is documented with names, date, and conditions.
This approach matters because, in practice, go/no-go decisions often degrade into informal hallway conversations. A documented matrix forces accountability. When the decision is "conditional go," the conditions (e.g., "deploy only after hotfix for defect #427 is verified") must be written down and tracked.
Evaluating Trade-Offs: When Context Changes the Approach
Not every project warrants the same level of formality. Consider how your approach should shift based on context:
- Regulated industries (healthcare, finance, aviation): The approval matrix may need to include compliance officers, and sign-off may require formal documentation for audit trails. Skipping this is not a shortcut — it is a liability.
- Rapid prototyping or internal tools: A lightweight version of the matrix — perhaps just product owner and QA lead — may suffice. Over-engineering the process for a low-risk internal dashboard creates unnecessary friction.
- Distributed teams: Asynchronous approval workflows become essential. Consider whether your tooling supports timestamped digital sign-offs, or whether you need to adapt the process.
The key question to ask is: What is the cost of a wrong go decision in this specific context? The higher the cost, the more rigorous the approval framework should be.
Tools Comparison
Tool | Type | Best For | Acceptance Test Support |
|---|---|---|---|
Jira + Zephyr Scale | Test management | Teams already using Jira | Custom UAT workflows, traceability to stories |
TestRail | Test management | Structured test plans | Milestone-based planning, stakeholder dashboards |
Azure DevOps Test Plans | Integrated ALM | Microsoft ecosystem teams | Built-in sign-off workflows, pipeline integration |
qTest | Test management | Enterprise-scale UAT | Exploratory + scripted sessions, approval chains |
Xray for Jira | Test management | Agile teams on Jira | BDD-native acceptance tests, coverage reports |
The best choice depends on your existing toolchain and the level of stakeholder involvement. If business users need to execute tests directly, prioritize tools with intuitive, non-technical interfaces.
Real-World Example: E-Commerce Platform Acceptance Test Plan
⚠️ Disclaimer: The following scenario is an illustrative example based on typical industry patterns. The specific metrics are hypothetical estimates designed to demonstrate realistic outcomes, not measured data from a documented project. They should not be cited as factual benchmarks.
Context
A mid-sized e-commerce company was preparing to launch a redesigned checkout flow affecting guest checkout, payment processing, and order confirmation. The team consisted of two Scrum teams, a shared QA lead, and a product owner who also served as the primary business stakeholder.
Challenge
Previous releases had used informal acceptance testing — the product owner clicked through the application for an hour before giving verbal approval. This approach had led to post-release defects in edge cases (e.g., coupon stacking, session timeout during payment) that cost significant effort to hotfix. There was no documented scope, no exit criteria, and no traceable connection between business requirements and tests.
Solution
The QA lead introduced a structured acceptance test plan using the framework described in this article:
- Scope document with explicit inclusions and exclusions, reviewed with the product owner before sprint 1 ended
- 42 acceptance test cases mapped to 15 user stories, each with defined pass/fail criteria
- Exit criteria checklist agreed on at sprint planning: no critical defects open, all high-priority cases executed, product owner sign-off documented
- Stakeholder approval matrix with the product owner as sole approver and the QA lead as recommender
- Test environment readiness checklist verified two days before UAT began, including payment gateway sandbox validation
Results
- In this illustrative scenario, post-release critical defects dropped by approximately 70% compared to the previous three releases
- Acceptance testing completed within the planned five-day window rather than extending into an open-ended cycle
- The go/no-go meeting took 30 minutes, with a clear "conditional go" (one medium-severity defect accepted with a planned hotfix date)
- Stakeholder confidence increased because the product owner could see exactly what was tested and what the residual risk looked like
Key Takeaways
- A structured acceptance test plan does not necessarily add overhead — it often reduces cycle time by eliminating ambiguity and rework
- The biggest efficiency gain frequently comes from scope definition, not test execution
- Documented go/no-go decisions protect both QA and the business when post-release issues arise
Common Mistakes to Avoid
These are the patterns that most often undermine acceptance test plans in practice:
- Treating UAT as a second regression cycle. Acceptance testing validates business value, not code coverage. If your acceptance tests are identical to your system tests, you are duplicating effort without adding signal.
- Writing the plan after testing starts. The plan should exist before the first acceptance test case is executed. Writing it retroactively defeats its purpose — you are documenting what happened, not what should happen.
- Omitting out-of-scope items. Defining what is not tested is often more important than defining what is. Without explicit exclusions, stakeholders may assume everything was validated.
- Using vague exit criteria. "All important bugs are fixed" is not a criterion — it is an invitation for debate at 5 PM on release day. Be specific, be risk-based.
- Skipping the approval matrix in small teams. Even on a five-person team, documenting who can approve or block a release prevents disagreements when stakes are high.